PCB Panelization for Assembly: 7 Mistakes and How to Avoid Them
Why PCB assembly is always done in panels, and seven common panel mistakes — from wrong V-score choices to parts near break lines — with a quick checklist to avoid them.
Microplacer team · 15 November 2026 · 5 min read
 PCB Assembly
Your layout passed every design rule check, the BOM is clean, and the Gerbers look perfect. Then the assembly line asks a simple question: how will this board travel through the machines? If the answer is a badly planned panel, you can lose days, yield or even parts. Here are seven panel mistakes we see often, and the easy way to avoid each one.
Mistake 1: Treating the panel as an afterthought
Assembly is done in panels, not on loose single boards. A stencil printer, pick-and-place machine and reflow conveyor all need a rigid frame to grip, align and carry. A small board alone is hard to clamp and can shift during printing. A panel gives the machines a solid handle and lets many boards be printed, placed and soldered in one pass. That is why we build PCBA only in panels — so plan the panel while you lay out the board, not after.
Mistake 2: Picking V-score or tab routing without checking the outline
There are two common ways to hold boards together in a panel, and each suits a different shape.
| V-score (V-cut) | Tab routing with mouse bites | |
|---|---|---|
| How it works | A V-shaped groove is cut from both sides, leaving a thin web that snaps cleanly. | Boards are routed out and held by small tabs, often perforated with a row of small holes. |
| Board shape | Straight edges only; the groove runs the full width of the panel. | Any outline: round, notched or irregular. |
| Spacing between boards | Boards butt against each other (no gap). | A routing gap is needed between boards (our panel guide uses 2.0 mm). |
| Mixed board sizes | Not suitable, because the groove cannot stop part-way. | Works well. |
| Edge finish | Clean but slightly angled edge. | Small bumps where tabs were; may need light sanding. |
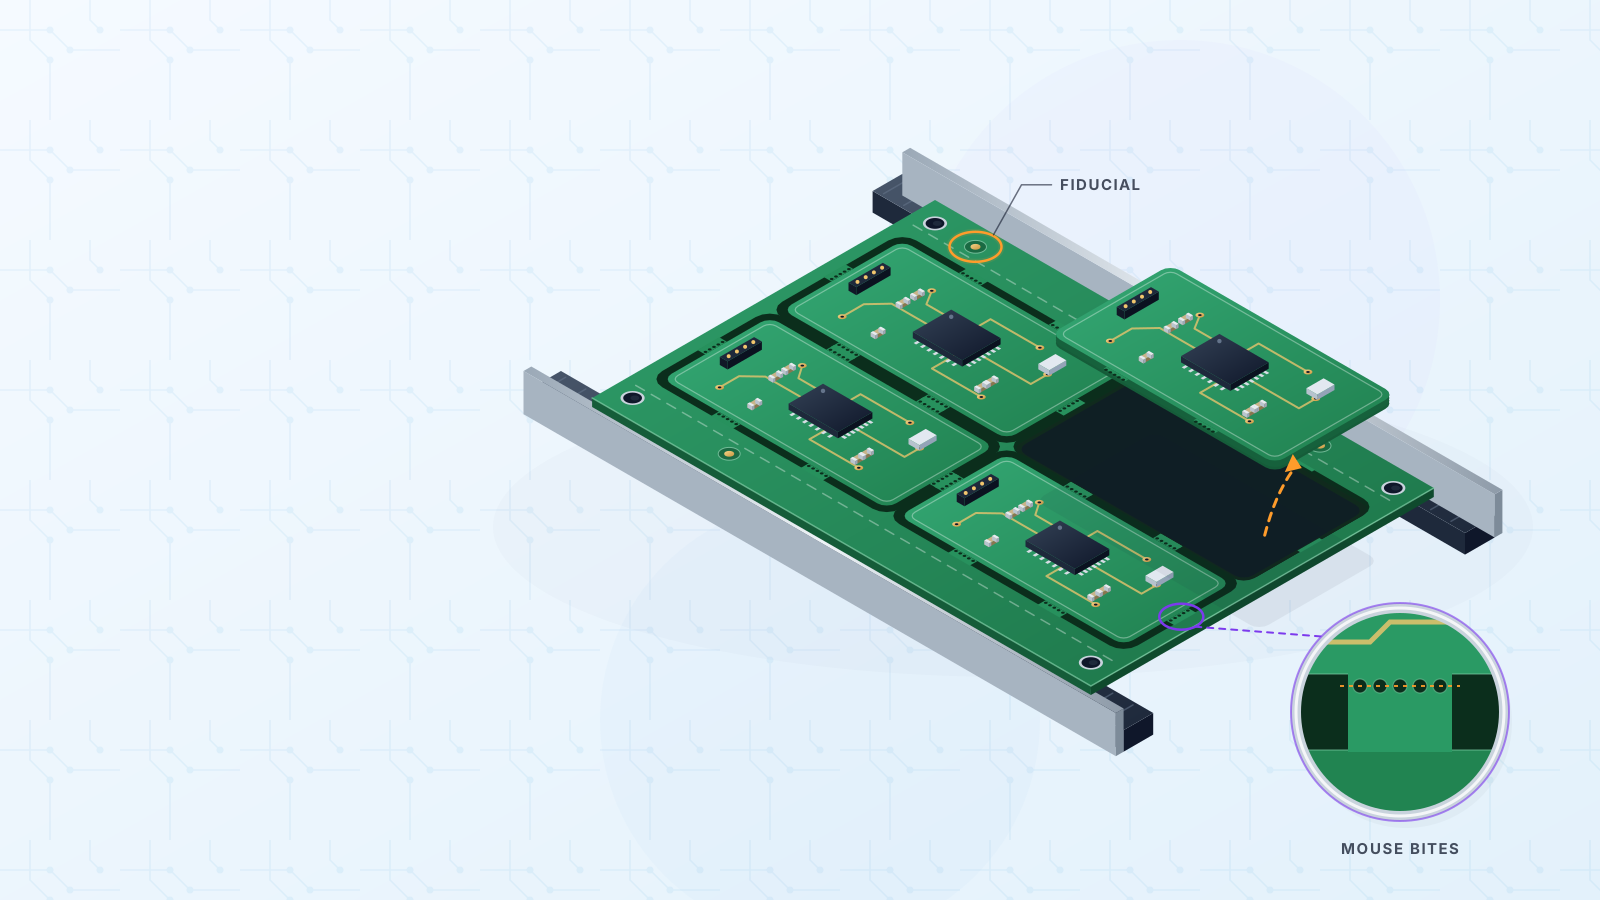
The classic slip is drawing a V-score panel around boards of different sizes or rounded corners. Since a V-groove has to run straight across the whole panel, it would cut through neighbouring boards. In that case choose tab routing. For mouse bites, our panel guide gives the details: holes of roughly 0.3–1.0 mm, at least 0.25 mm apart, about five or six per tab.
Mistake 3: Forgetting rails, fiducials and tooling holes
A panel is more than boards stitched together. It needs a frame the machines can work with:
- Rails (tooling strips) along the conveyor edges give the transport belts something to hold that has no parts on it. Our guide suggests strips about 7 mm wide.
- Fiducial marks are bare copper dots the camera uses to locate the panel precisely. Plan at least three, around 1 mm in diameter, placed on the rails and not in a symmetrical pattern so orientation is unambiguous.
- Tooling holes let the panel be pinned in place for printing and inspection. A diameter of about 3 mm, kept well clear of the rail edge, is a sensible starting point.
Skip them and alignment gets slower and less dependable, above all for fine-pitch parts.
Mistake 4: Letting parts hang over the board edge
Connectors, USB sockets, switches and edge-mounted LEDs often stick out past the outline. On a single board that is fine; on a panel it can clash with the neighbouring board, the rail or the depaneling tool. If a part overhangs, leave a cut-out or a wider gap in the panel at that spot, or move the rail to the opposite side. Mention the overhang in your notes so it is not a surprise during review.
Mistake 5: Placing sensitive parts near the break line
Snapping a V-score or breaking a tab bends the board for a moment, and that stress travels inward. Multilayer ceramic capacitors are especially prone to hairline cracks that pass test today and fail weeks later. BGAs, crystals and large ceramic parts are also at risk. Give them distance from any break line, turn long ceramic parts so their length runs along the score instead of crossing it, and do not put a tab right beside them.
Mistake 6: Supplying your own panel without checking our rules
You have two options. You can upload a single board and let our team panelize it to suit the assembly process, or you can upload a ready-made panel file. A self-made panel is great when you need a specific layout, a test coupon or a depaneling method your enclosure depends on — but it must follow the spacing, rail and fiducial rules above, and fit within the panel size limits listed on our PCB assembly capabilities page. If you are unsure, upload the single board, add a short note about any must-have (break-off direction, connector side, number of boards per panel) and let us propose the panel. Either way, our engineers check the files before production and compare your notes with our options.
Mistake 7: Skipping a final panel review
Before you place the order, run through this quick checklist:
- 1Board outline: straight edges for V-score, or tab routing for irregular or mixed shapes.
- 2Spacing: no gap for V-score, a routing gap for tabs.
- 3Rails present on the conveyor edges, free of components.
- 4At least three fiducials and tooling holes on the rails.
- 5No overhanging parts colliding with neighbours or rails.
- 6Ceramic capacitors, crystals and BGAs kept away from break lines.
- 7Board size confirmed: we read it from your Gerber automatically, but please check it matches your design.
Your next step
Ready to build? Read the full panel guide for spacing and fiducial details, check the PCB assembly capabilities for size limits, then upload your files for an instant PCBA price.
#panelization#pcb-assembly#v-score#mouse-bites#fiducials#dfm
Get an instant PCB quote